
 Pin it
I've gotta share my family's top dessert pick for celebrations! I was tired of overpaying for store-bought ice cream cakes, so I figured out how to whip up our own DQ-style treat at home. It's basically happiness stacked in layers - your top ice cream picks sandwiching a rich fudge middle, plus that irresistible crunchy Oreo section everyone wants more of! And guess what? You can fix it up days before your event, which has been a total lifesaver during many birthday bashes. Once you see how simple this is, you'll never look back!
What Makes This Treat So Special
This cake has become my go-to crowd-pleaser after so many birthday gatherings and summer get-togethers. It's got five amazing layers you can switch up however you want - like getting a fancy ice cream cake but even better since you're in charge! My daughter's friends now ask for 'that incredible ice cream cake' whenever they come over. And since you don't need to bake anything, it's just what you need during those scorching summer days when the thought of using your oven makes you sweat.
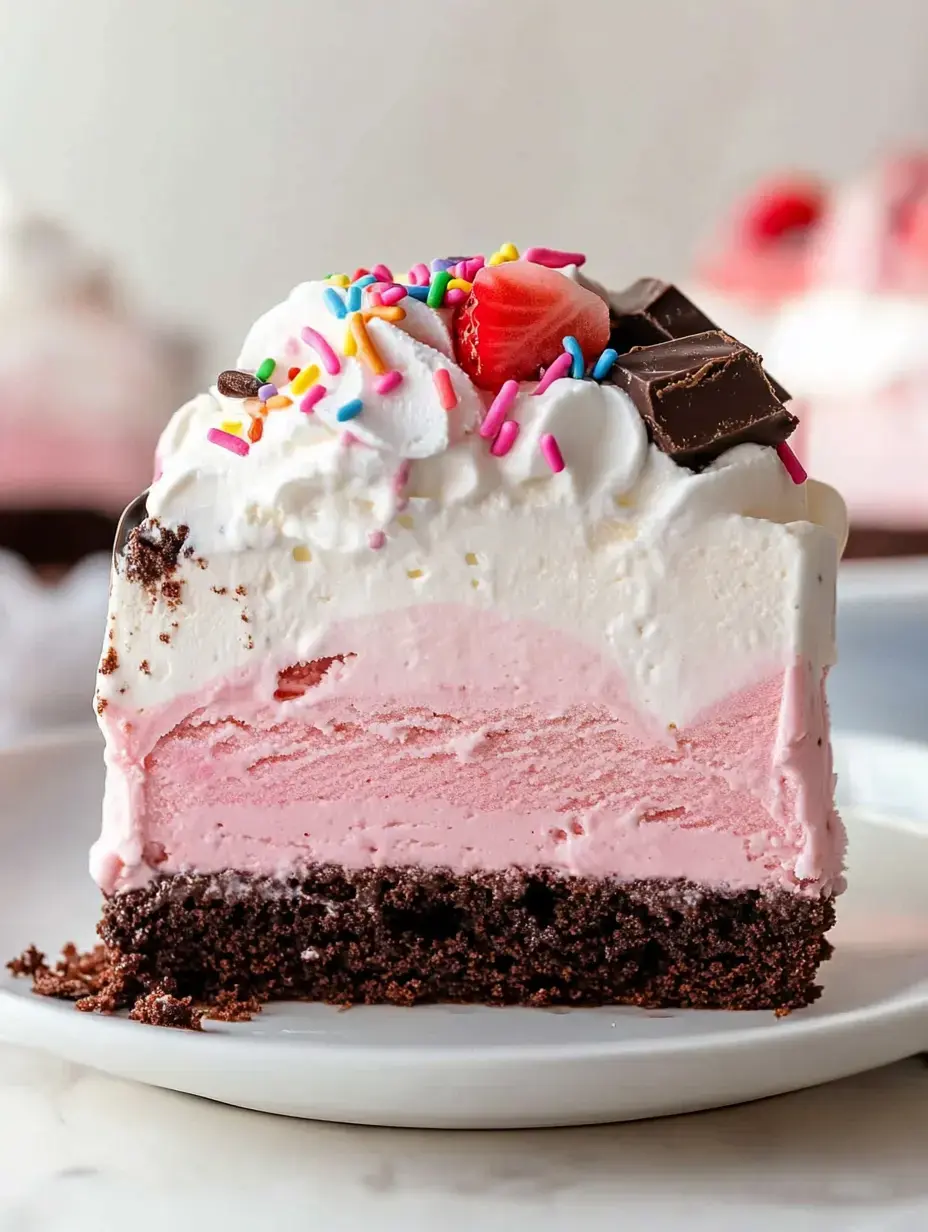
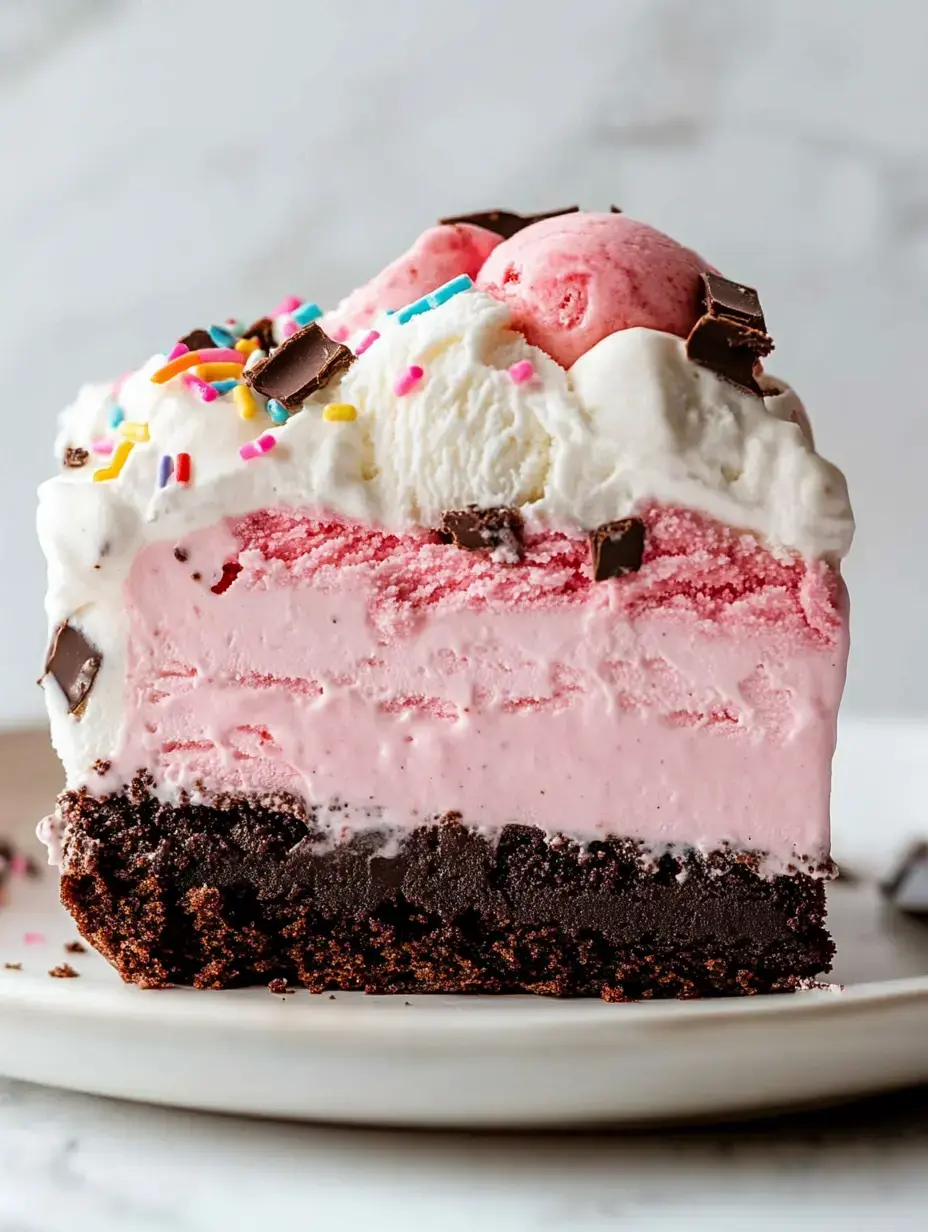
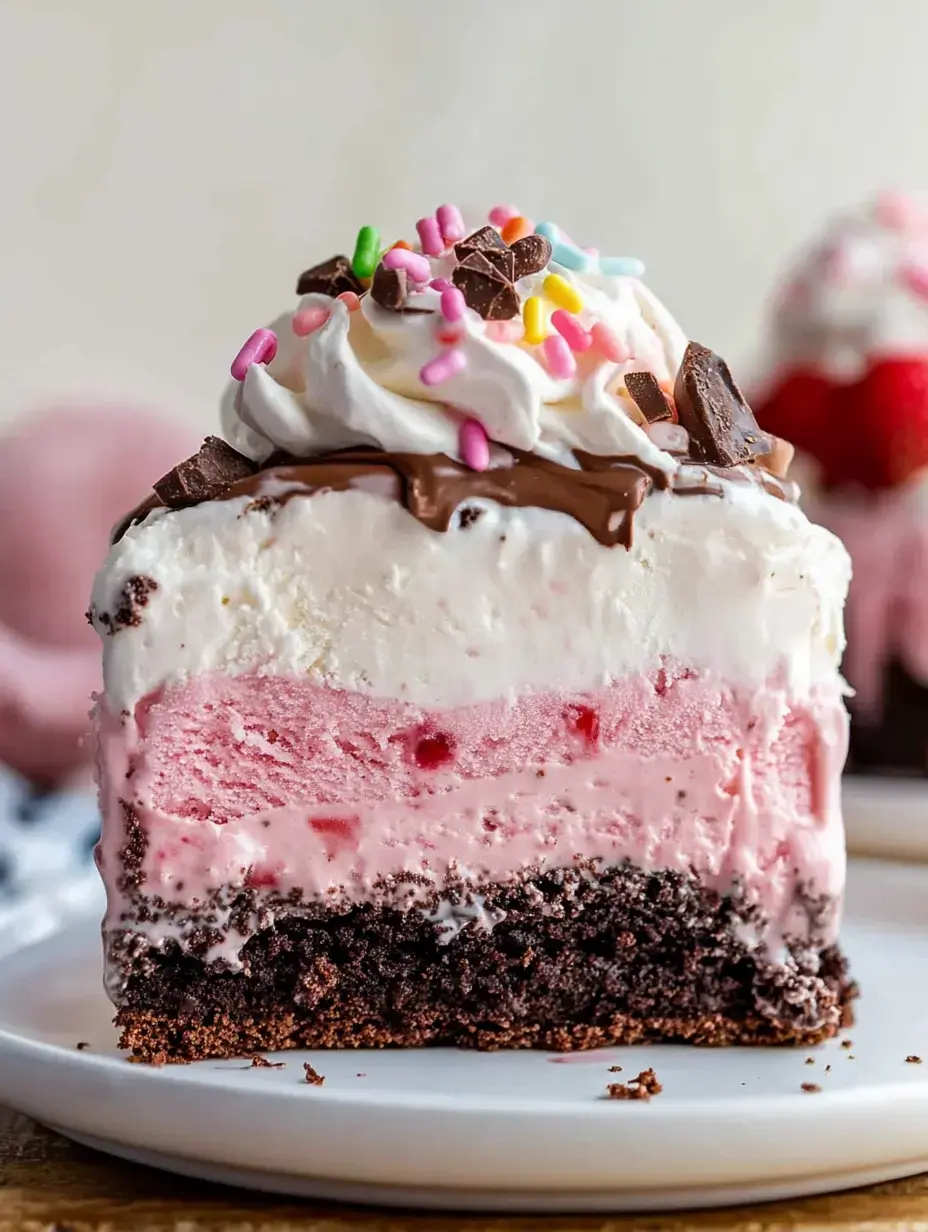
Let's Break Down Each Layer
- Pick Your Ice Creams: Here's where you can get creative! We typically go with vanilla and chocolate, but my kids love throwing in cookie dough or mint chip for fun.
- The Fudgy Middle: This homemade hot fudge really takes everything up a notch! But honestly, the jarred stuff works in a hurry too.
- Crunchy Cookie Mix: Don't forget the butter when mixing with your smashed Oreos - it's what creates that authentic DQ-style texture!
- Creamy Topping: Homemade whipped cream makes such a big difference. I always mix up extra because somebody (usually me) needs to taste-test it.
- Finishing Touches: Go crazy with those sprinkles! They aren't just for looks - they add a nice little crunch too.
 Pin it
Must-Have Equipment
Let me save you from my rookie mistakes - you really need a springform pan for this! I use a 9-inch one that's fairly deep (at least 3 inches tall). Here's a tip I learned through trial and error: cover it with plastic wrap and leave some hanging over the edges. This makes getting your finished cake out so much easier. Don't have a springform? No worries! A 9×13 dish works great too, especially when you're feeding a bigger group.
Putting It All Together
- Getting Ready
- Prep that pan properly! The plastic wrap seems fussy but will save you trouble later.
- Bottom Ice Cream
- Begin with your first ice cream flavor. Let it soften just enough to spread easily - about 10 minutes sitting out does the trick.
- Adding The Fudge
- After that first layer freezes solid, spread on your barely warm fudge. Remember, just 'barely' warm - too hot and everything turns into a melty disaster!
- Cookie Layer Time
- The Oreo mixture is what everyone fights over. Smart move: keep some crumbs aside for munching later!
- Second Ice Cream
- Your next flavor goes on now. Work fast here so your bottom layers stay nice and frozen.
- Finishing Touch
- That fluffy whipped cream topping makes it look so impressive. This is usually when kids beg to help sprinkle decorations!
Fun Flavor Combinations
Now for the fun part! My son can't get enough of chocolate paired with peanut butter ice cream, while my daughter always wants mint chip with cookies & cream. Last summer we tried a coffee ice cream layer that had all the grown-ups scrambling for seconds. Remember, when it comes to ice cream cake, there's no wrong way to mix things up!
Tricks For The Best Results
- Perfect Softening: About 10 minutes on the counter usually works for ice cream. Too soft and your layers get messy.
- Work Quickly: I set up everything before I start. Think of it like your own ice cream factory line!
- Freeze Between Steps: Every freezing break matters. I use timers so I don't rush things.
- Don't Skip The Butter: It's what makes that Oreo layer so amazingly crunchy.
- Cutting Clean Slices: Dip your knife in hot water between cuts for picture-worthy pieces.
- Chill Your Plate: I even pop my serving dish in the freezer for 15 minutes before bringing out the cake.
 Pin it
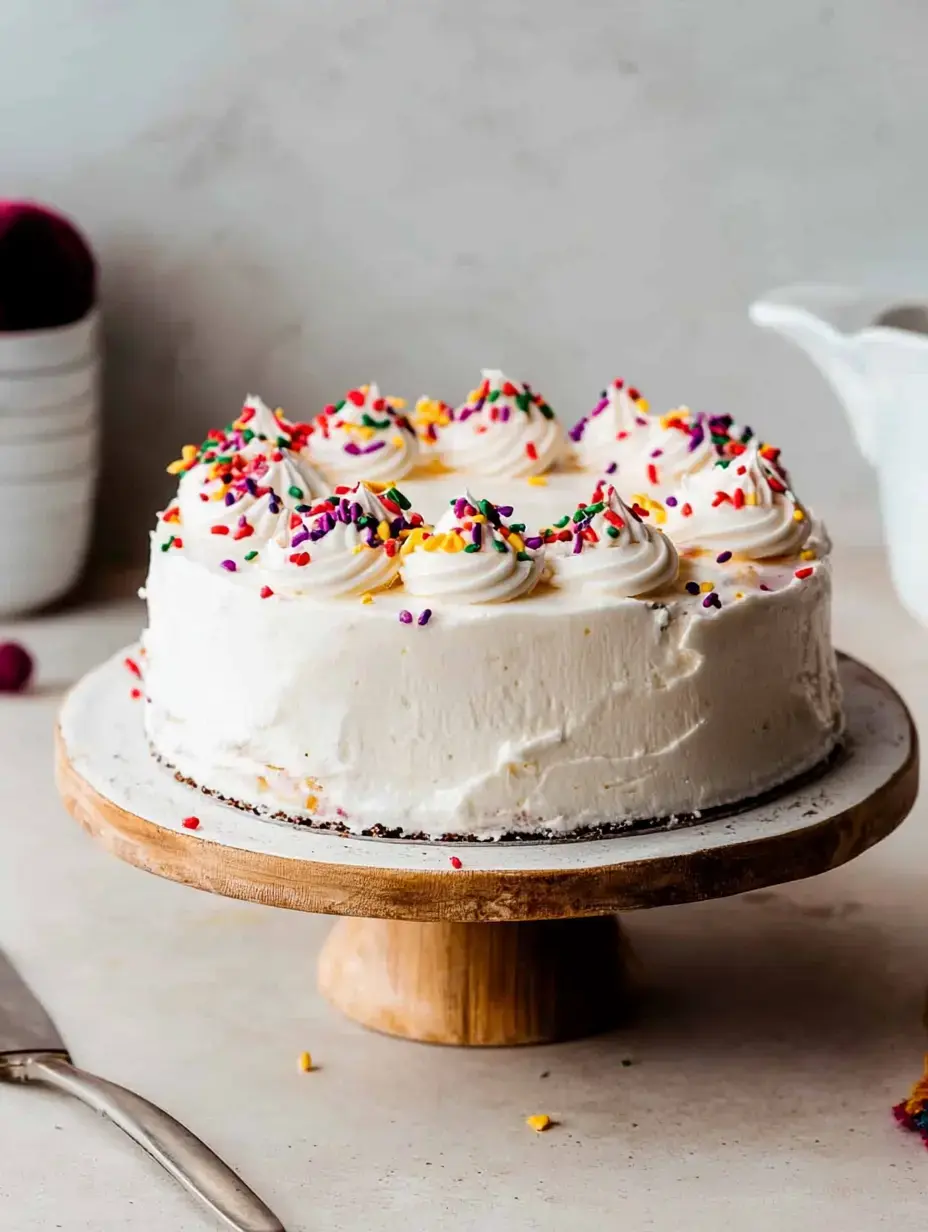
Showing Off Your Creation
I love the moment everyone sees those perfect layers! For an extra special touch, I sometimes scatter fresh berries around the plate or drizzle more hot fudge on top. And don't forget to snap a picture - this cake definitely deserves to be shared online!
Prep It Early
This cake is such a lifesaver for busy parents! I usually make mine two days before any party, which crosses one big task off my list early. Just wrap it well in the freezer, and it'll be ready when your event rolls around. During birthday season, I've even made two at once!
Perfect For Kids To Help
Kids absolutely love making this! My little ones get so excited picking ice cream flavors and helping with the layers. Sure, things get a bit messy, but those kitchen memories are worth it. They always light up when it's time to add sprinkles - watching them decorate makes my heart happy!
Storing Any Extras
If you somehow don't finish it all (which hardly ever happens at my place!), here's how to keep leftovers fresh: wrap each slice in plastic, then foil. They'll stay good for about a week, though they never stick around that long! When you're ready for another piece, let it sit out for just 5 minutes before digging in.
 Pin it
Timeless Family Favorite
There's something really special about this cake - it brings back memories with every bite. Whether we're celebrating birthdays, summer cookouts, or just because, this dessert turns ordinary moments into something special. The mix of smooth ice cream with that crunchy middle and those swirls of fudge - it's just magic!
Great For Any Gathering
This has turned into my number one dessert for all celebrations! From my son's team parties to my daughter's birthday sleepovers, it always gets compliments. I love how you can match it to any theme by just changing up the sprinkles or adding themed decorations on top. Instant party upgrade!
Options For Everyone
Need a more health-conscious version? I've got ideas! My sister makes hers with low-fat ice cream and it's still amazing. For my nephew who can't have dairy, we use plant-based alternatives. You can swap the Oreo layer for graham crackers instead, and adding fresh fruit brings natural sweetness. It's all about making sure everyone gets to enjoy!
 Pin it
Extra Special Touches
Want to make your cake stand out even more? Try these fun additions! I love sprinkling chocolate curls on top (just run a vegetable peeler down a chocolate bar), or sometimes I crush up favorite candy bars as toppings. Fresh mint leaves look stunning, and a quick drizzle of caramel sauce really makes it pop!
Perfect For Any Season
The best thing about this cake is how easily it adapts to different times of year! During Christmas, we love using peppermint ice cream with crushed candy canes. Summer calls for fresh berry swirls mixed with vanilla. In fall, try pumpkin ice cream with gingersnap bits. You can really make it work year-round!
Frequently Asked Questions
- → Can I make this dessert in advance?
- Yes, you can put it together and freeze it up to 2 days ahead. For best slicing, add the whipped cream topping right before serving.
- → What type of pan should I use?
- A 9- or 10-inch springform pan works perfectly. You could also use a 9x13-inch dish or scale it down to fit an 8-inch square pan.
- → Can I switch the cookies for something else?
- Definitely! Try graham crackers, crunchy peanut butter cookies, or any other firm cookie. Soft homemade cookies won’t work well.
- → How can I slice it cleanly?
- Use a sharp knife warmed up in hot water. Slice quickly and carefully. You can serve immediately or freeze it again for up to an hour.
- → What if I want to add a cake layer?
- Go for it! Replace one of the ice cream layers with a chocolate or vanilla cake layer. Just make sure the cake is frozen before assembling.